DIY Golf Simulator Enclosure: Build a Frame & Hang a Screen
How to build a DIY golf simulator enclosure: pipe vs wood frame, sizing to your room, hanging an impact screen with bungee tension, side netting, and a safety standoff.
A DIY golf simulator enclosure comes down to two jobs done well: build a rigid frame sized to your room, and hang an impact screen with enough tension to play but enough give to be safe. Do those two things right, add side netting and a safety standoff, and you have a bay that rivals a pre-built kit for a fraction of the cost. This guide covers pipe versus wood frames, the dimensions that actually matter, how to tension a screen with bungees, and the containment and clearance details that keep your room, your gear, and you safe.
Before you buy a single fitting, size your space. Width and ceiling height drive every other decision, so run your numbers through the golf sim room size calculator first, then come back and build to those figures.
DIY enclosure shopping list
Screen, side netting, frame fittings, and bungees to build and tension your own bay.
-
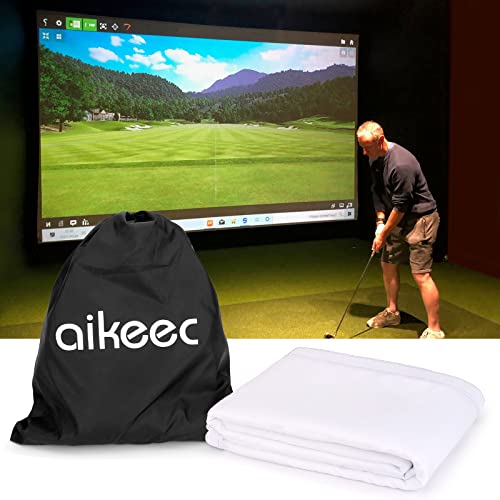 Impact screen aikeec 7mm Thickened Impact Screen with Grommets
An ultra-clear DIY hitting screen with 32 reinforced grommets, sized to bungee-tension onto your own frame.
$104.99
Shop on Amazon → -
 Side netting ParPeak Golf Side Nets Barrier, 7 ft x 10 ft
Heavy-duty side netting that hangs alongside the screen to catch shanks and pushes, with a sandbag to anchor it.
$32.29
Shop on Amazon → -
 Frame hardware Fanmao 4-Way Structural Pipe Connectors, 4 Sets (3/4" EMT)
Galvanized slip fittings for 3/4-inch EMT conduit, the fast clean way to assemble a pipe enclosure frame.
$23.99
Shop on Amazon → -
 Screen tension HORUSDY 31-Piece Bungee Cords Assortment
A mixed-length bungee set to tension the screen evenly while letting it flex on impact, never drum-tight.
$15.99
Shop on Amazon →
Prices update on Amazon and change often. As an Amazon Associate we earn from qualifying purchases at no extra cost to you.
Pipe vs wood: choosing a frame
The frame is the skeleton that holds your screen and netting. Two materials dominate DIY builds, and each has a clear personality.
| Frame type | Strengths | Trade-offs |
|---|---|---|
| Pipe (EMT conduit or galvanized pipe + fittings) | Fast assembly, clean look, easy to adjust or disassemble, no power tools needed | Fittings add cost; needs careful measuring; can flex if undersized |
| Wood (2x4 lumber, screwed or bracketed) | Cheapest material, very rigid, forgiving for basic DIYers | Heavy, semi-permanent, harder to modify or move later |
Pipe frames using steel EMT conduit and slip fittings, or thicker galvanized pipe with structural connectors, are the most popular DIY route. They assemble in an afternoon, look tidy, and break down or adjust easily if your needs change. Step up the pipe diameter on wide spans so the top bar does not sag under the screen's weight.
Wood frames built from 2x4s are the budget champion and extremely rigid once fastened. They suit a permanent bay where you will not move things, but they are heavy and far harder to tweak after the fact. If you own a drill and a saw and want maximum stiffness for minimum dollars, wood is hard to beat. If you value adjustability and a clean look, go pipe. Either way, anchor a tall frame so a hard shot cannot rock it.
Sizing the frame to your room
Most DIY enclosures fail on dimensions, not construction. Build to your swing, not to the smallest box you can fit.
- Width: Plan at least 10 feet of interior width for a single-handed setup, and 12 feet for comfortable clearance. For a bay that serves both right and left-handed players, target 15 feet or more of room width so both can tee up without crowding the frame.
- Ceiling height: About 9 feet is a practical minimum for a full driver swing, 10 feet is comfortable, and under roughly 8.5 feet pushes you toward irons only. Always make a real full swing with a club in the space before committing.
- Depth: Leave room for the safety standoff behind the screen plus your hitting position and, if you run a radar monitor, enough ball-flight distance for it to read. Around 12 feet deep is a workable minimum; 15 feet is comfortable.
Confirm these against your actual space with the room size calculator. The single most common regret is building too narrow, so when in doubt, add width.
Hanging the impact screen
The impact screen is the heart of the enclosure, and how you mount it determines both image quality and longevity. The goal is a flat, taut surface that still flexes on impact.
- Hang from the top first. Attach the screen's top edge to the upper frame bar using its grommets or sleeve, spacing the attachment points evenly so the screen hangs flat with no wrinkles.
- Tension with bungees, not rigid ties. Run bungee cords or elastic shock cord from the side and bottom grommets to the frame. The elastic pulls the screen taut while letting it give on impact, which protects the screen and reduces ball wear.
- Balance the tension. Work around the perimeter, adjusting bungees so the surface is evenly flat. A screen that is too loose ripples the image; one cinched drum-tight with rigid straps bounces balls back hard and tears sooner.
That controlled give is the whole point. A properly tensioned screen absorbs the shot, kills most of the energy, and drops the ball at the base instead of firing it back at you. For material choices and durability, see our roundup of the best golf impact screens, and if you would rather buy a complete kit than source parts, compare the best golf simulator enclosures.
Side netting and baffles
Even good ball strikers shank one now and then, and a mishit can leave the clubface sideways or steeply upward. Containment catches those.
- Side netting: Run black netting down both sides of the enclosure from the frame to catch toe and heel strikes that miss the screen, protecting walls and anyone nearby.
- Top baffle: Hang a net or baffle across the top, angled slightly back toward the screen, to catch skulled or thin shots that fly high and to knock down bounce-back.
- Floor containment: A loose flap of screen or netting at the base helps trap balls that drop after impact so they do not scatter into the room.
Use knotless or knotted golf-rated netting rated to absorb real club speed, not garden netting. Side and top containment is safety equipment, full stop. Skipping it is how people put a ball through drywall or a window.
Safety standoff and clearance
Leave roughly 12 to 18 inches of clear space between the impact screen and any wall behind it. This standoff gap is what lets the screen flex backward as it absorbs a shot. Without it, a hard drive can punch the screen into a solid wall, damaging the wall, the screen, or sending the ball rocketing back toward you.
Mind your other clearances too. Keep the projector and any lights out of the ball's likely flight paths, protect overhead fixtures with the top baffle, and make sure no one stands in the bounce-back zone during play. Anchor a tall pipe frame so a flush hit cannot tip it. Treat the standoff and clearances as core structure, not afterthoughts: they are what turn an enclosure from a hazard into a safe, repeatable practice bay.
Build order at a glance
- Measure your room and size the frame with the room size calculator.
- Build the frame (pipe for adjustability, wood for rigidity) and anchor it.
- Leave a 12 to 18 inch standoff behind the screen plane.
- Hang the screen from the top, then tension the sides and bottom with bungees.
- Add side netting and a top baffle for mishit containment.
- Confirm clearances and keep the bounce-back zone clear during play.
Build to your swing and respect the safety standoff, and a DIY enclosure will give you years of confident, full-speed practice. Start with the best golf impact screens for the surface, or shortcut the whole project with a ready-made kit from the best golf simulator enclosures.
Golf Sim Build Planner
Room-fit worksheet, gear checklist, budget tracker, and wiring and lighting plan, in one printable planner that takes your build from idea to first swing.
Frequently Asked Questions
Should I build my enclosure frame from pipe or wood?
Both work, and the right choice depends on your skills and goals. Steel EMT conduit or galvanized pipe with fittings goes together fast, looks clean, and is easy to take apart or adjust, which is why it is the most popular DIY route. A wood frame from 2x4s is cheaper, very rigid, and forgiving if you own basic tools, but it is heavier and harder to modify later. Pipe wins for adjustability; wood wins for cost and rigidity.
How wide does a DIY golf simulator enclosure need to be?
Aim for at least 10 feet of interior width for a single right-handed or left-handed player, and 12 feet for comfortable clearance. If both right and left-handed golfers will use it, plan for 15 feet or more of room width so both can tee up without crowding the frame. Width is the dimension people most often underbuild. Always swing a club in the space before you commit to a frame size.
How do I hang an impact screen so it stays tight?
Suspend the screen from the top bar with the grommets or sleeve, then use bungee cords or elastic shock cord through the side and bottom grommets to the frame. The bungees apply even tension while still giving the screen flex to absorb ball impact, which protects both the screen and your golf balls. Avoid pulling it drum-tight with rigid ties, since a screen with no give bounces balls back hard and wears out faster.
Do I need a safety standoff behind the impact screen?
Yes. Leave roughly 12 to 18 inches of clear space between the impact screen and any wall behind it. That gap lets the screen flex backward as it absorbs a shot, prevents the ball from punching the screen into a hard surface, and dramatically reduces bounce-back. Without a standoff, hard drives can damage the wall, the screen, or send the ball rocketing back toward you. The gap is a core safety feature, not optional.
What are baffles and side netting for?
Baffles and side netting catch mishits that miss the impact screen. A toe or heel strike, a shank, or a skulled shot can fire sideways or upward, so black netting along the sides and a baffle or net across the top contain those balls and protect walls, ceilings, lights, and people. They also reduce bounce-back into the room. Treat side and top containment as essential safety gear, not a finishing nicety, in any DIY enclosure.
Can I build an enclosure in a garage with a low ceiling?
Sometimes, but check your full swing first. You generally want about 9 feet of ceiling height as a practical minimum for a full driver swing, 10 feet to be comfortable, and under about 8.5 feet pushes you into irons-only territory. Stand where you will hit and make a full driver swing with a club in hand to confirm you have clearance. Build the frame to fit under your real ceiling, not the nominal room height.
Building a golf sim?
Use our free calculators and guides to size the room, the gear, and the budget.
Build Planner: $39